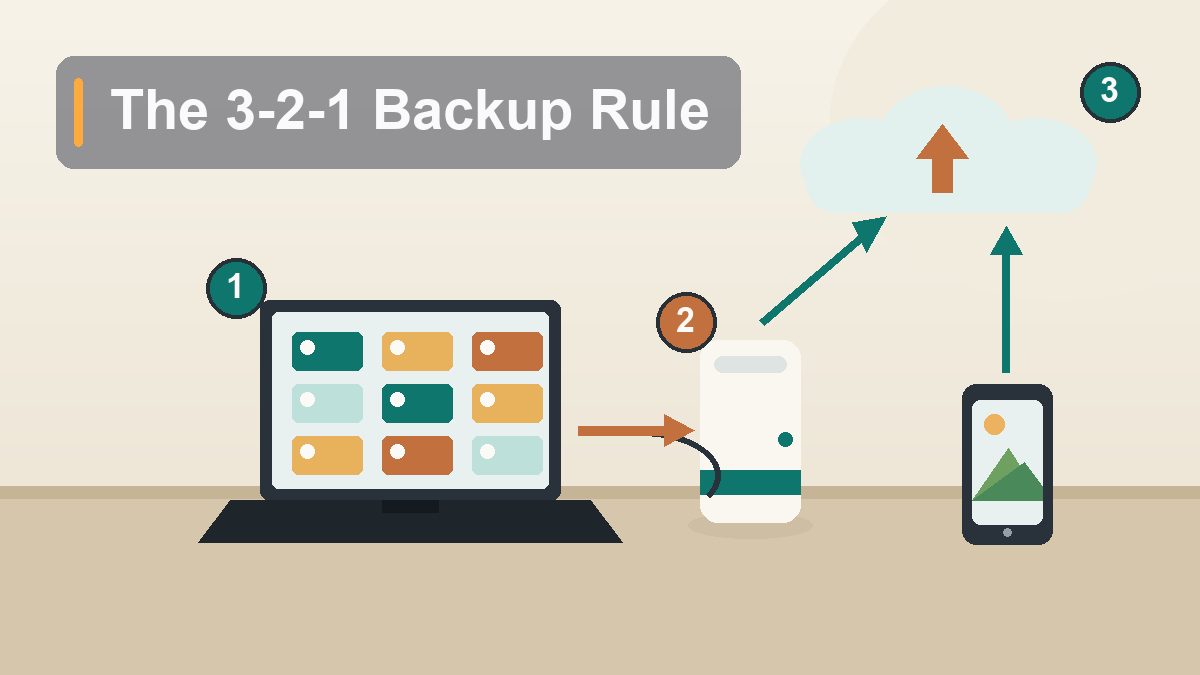
The 3-2-1 Backup Rule: How to Never Lose Your Photos and Files
Every photo you’ve ever taken is one spilled coffee away from gone forever — unless you follow a rule old enough to have a beard: three copies, two kinds of storage, one of them somewhere else. Here’s the whole setup, and it costs you one afternoon.
Here’s a story you’ve heard before, possibly starring someone you know, possibly starring you. The laptop is five years old and making a sound like a small appliance with opinions. One morning it simply doesn’t turn on. No warning, no error message, just a black screen and a fan that never spins up. And in the silence that follows, a number surfaces from somewhere deep in your memory: the photos. The kids’ first years. The trip to Banff. The scan of your grandmother’s wedding picture that doesn’t exist anywhere else because the original got lost in a move in 2009. All of it was on that laptop. All of it was only on that laptop. This story has a happy version and a terrible version, and the only difference between them is whether you set up backups before the morning in question. The happy version requires about one afternoon of setup and roughly the cost of a decent dinner out, once, plus a few dollars a month. The terrible version costs a data-recovery lab $800 and a coin flip. This article is the afternoon.
What the 3-2-1 Rule Actually Says
Three copies, two media, one offsite
The rule comes from the photography world — photographer Peter Krogh popularized it in the 2000s, and it’s since become the standard advice repeated by everyone from IT departments to the U.S. government’s cybersecurity guidance. It goes like this: keep three copies of anything you care about, on two different types of storage, with one copy stored offsite. That’s it. That’s the whole rule. Your original files on your computer count as copy number one, which means you only need to build two more.
Why these specific numbers? Because each part kills a different way of losing everything. Three copies means no single failure can take you out — drives die, laptops get stolen, phones go swimming in lakes, and they all do it without asking permission first. Two different types of media — say, your computer’s internal drive plus an external drive — protects against the failure modes that hit one kind of hardware at a time, like a power surge frying everything plugged into the same outlet. And one copy offsite protects against the disasters that don’t care how many drives you own if they’re all in the same house: fire, flood, theft, the burst pipe above the desk.
The rule is deliberately low-tech. It doesn’t care whether your offsite copy is a cloud service or a hard drive at your sister’s place in Calgary. It doesn’t care what brand of drive you buy. It cares about geometry: your files should exist in three places, not all the same kind, not all the same building. Everything else is implementation detail.
What Doesn’t Count as a Backup
The comfortable lies people tell themselves
Before we build the real thing, let’s clear out the fakes, because most people who “have a backup” actually have one of these:
“I moved everything to an external drive.” Moved. Not copied. That’s not a backup — that’s just your files wearing a different outfit, still existing exactly once in the universe, now on a device that gets dropped more often. If the drive fails, and portable drives fail at genuinely impressive rates, everything is gone.
“My photos are in iCloud / Google Photos.” Closer, but sync is not backup. Sync is a mirror, and mirrors reflect everything — including your mistakes. Delete a photo on your phone and it vanishes from the cloud too, usually within seconds, on every device. Ransomware that encrypts your files? It syncs beautifully. Sync is one leg of the system (and a great one — we’ll use it), but a single synced copy is still a single point of failure wearing a cloud costume.
“I back up… sometimes. When I remember.” A manual backup is a snapshot of the person you were on the last day you remembered. If that day was fourteen months ago, your backup is fourteen months old. Anything that depends on your memory is not a system; it’s a hobby. The entire point of the setup below is that after one afternoon of configuration, you never have to remember anything again.
The Three Copies, Concretely
The actual shopping list
Here’s the standard setup for a normal household — one or two computers, phones full of photos, a documents folder with taxes and passports scans and the PDF of the mortgage papers:
Copy 1: Your computer. This is your working copy, the one you already have. Done. Feel free to enjoy having completed one-third of a backup strategy by reading this paragraph.
Copy 2: An external drive at home. A basic USB external hard drive, 2 to 4 terabytes, which costs roughly $70 to $110 depending on size and sales — pick one at least double the size of whatever you’re backing up, because backup software keeps history and history needs room. This drive lives near your computer and gets automatic, continuous backups via software that’s already built into your computer for free (File History on Windows, Time Machine on Mac — setup below). This copy handles the common disasters: dead laptop, deleted folder, “I saved over the wrong file.”
Copy 3: The cloud. A backup or sync service that keeps a copy on servers far away from your house — iCloud, Google One, OneDrive, or a dedicated backup service like Backblaze. For most families this runs about $3 to $10 a month depending on how many photos you have. This copy handles the rare-but-total disasters: the fire, the burglary, the day both your laptop and the drive next to it die in the same power surge.
| Copy | Where it lives | What it protects against |
|---|---|---|
| 1. Original | Your computer’s internal drive | Nothing by itself — this is the thing being protected |
| 2. External drive | Next to your computer, updated automatically every hour/day | Dead drive, deleted files, accidental overwrites, laptop theft |
| 3. Cloud | Remote servers, synced continuously in the background | Fire, flood, theft, power surge — anything that kills everything in the house at once |
Notice the division of labor: the external drive is fast and free to use but shares your house’s fate; the cloud is slow to restore from but survives everything short of the apocalypse. Together they cover each other’s weaknesses. That’s the two-out-of-three genius of the rule — any single disaster leaves you with at least one intact, restorable copy.
Setting Up the External Drive on Windows
File History, ten minutes, then never think about it again
Windows has included a perfectly good automatic backup tool since Windows 8, and almost nobody turns it on, which is a bit like owning a smoke detector still in its box. It’s called File History, and here’s the entire setup: plug in your external drive. Open the Control Panel, go to System and Security, and find File History (or search “File History” from the Start menu). Select your external drive and click “Turn on.” That’s it. From now on, File History quietly copies your Documents, Pictures, Desktop, and other library folders to the drive every hour by default, keeping versions as it goes — so you can get back not just the file you deleted, but the version of the file from before you ruined it last Tuesday.
Two settings worth adjusting in the “Advanced settings” panel: change the frequency from hourly to every three or six hours if the constant disk activity bothers you (it shouldn’t — modern machines shrug this off), and check “Keep saved versions” — “Forever” is the honest answer if your drive is big enough. Microsoft’s own walkthrough, Backup and restore with File History, has screenshots of every screen if you want a companion guide. One honest caveat: File History backs up your user folders, not your whole system, which is exactly right for photos and documents — you don’t need a backup of Windows itself, you need a backup of the stuff that’s irreplaceable. Windows can be reinstalled. Your 2016 vacation cannot.
The only ongoing discipline: leave the drive plugged in when you’re home, or plug it in on a regular cadence — File History catches up automatically when the drive reappears. Some people keep the drive connected permanently to a desktop; laptop people often plug in during the evening while the machine charges. Either way, the remembering burden is near zero, because the software nags you if too long passes.
Setting Up the External Drive on a Mac
Time Machine, the easiest yes in computing
Mac owners have it even easier. Time Machine has shipped with macOS since 2007 and remains the single most frictionless backup system ever shipped to consumers. The setup: plug in your external drive. Your Mac will likely ask, within seconds, “Do you want to use this drive to back up with Time Machine?” Click yes. If it doesn’t ask, open System Settings, go to General, then Time Machine, and select the drive manually. Then walk away. The first backup takes hours (it’s copying everything), but it runs in the background and doesn’t care if you keep working; every backup after that is incremental and takes minutes, hourly, forever. Apple’s official guide, Back up your Mac with Time Machine, covers the details.
Two Time Machine behaviors worth knowing. First, it keeps local snapshots on your Mac’s internal drive even when the external drive is unplugged, which has saved many a laptop user from themselves between backup sessions. Second, it keeps hourly backups for the past day, daily backups for the past month, and weekly backups until the drive fills up — which is why you bought a drive bigger than your data. When the drive finally fills, Time Machine quietly deletes the oldest backups to make room, which is correct behavior, not a problem. If you want the belt-and-suspenders version (and you do, eventually), a second cheap drive rotated monthly — one always at home, one in a drawer at your office or a family member’s place — turns Time Machine into a physical offsite copy for free.
The Cloud Copy: Pick One and Turn It On
Where copy number three lives
For the offsite copy, the decision tree is mercifully short. If your household is Apple-flavored — iPhones, Macs — iCloud is the path of least resistance: photos sync via iCloud Photos, and your Desktop and Documents folders can sync to iCloud Drive with one checkbox. If your household runs on Android and Gmail, Google One does the same job through Google Photos and Drive. If you’re a Windows-and-Office family, OneDrive is already woven into the system you have. Dedicated backup services like Backblaze take a different approach — they back up everything on your computer, indiscriminately, for a flat fee, which is wonderfully simple if you’d rather not think about which folders count. Any of these satisfies the rule. The wrong choice is not “the wrong service” — it’s “none of them, because deciding felt like homework.”
One clarification that matters: most of these services are sync services, which means the delete-mirror problem from earlier still applies. The protections that make sync acceptable as your third copy are the safety nets the services now build in — trash folders that hold deleted files for 30 days, version history on documents, and account-recovery options. Check that they’re on. And remember the geometry: sync errors propagate to the cloud, but they do not propagate to your Time Machine or File History drive, which keeps its own independent history. This is why the rule wants different kinds of copies, not just different locations — the failure modes don’t overlap.
Your Phone Is the Real Crisis
The camera roll problem
Here’s the uncomfortable truth about where your photos actually live: not on the computer you’ve been carefully backing up, but on your phone — the device you drop, lose, leave in taxis, and submerge in bodies of water at a rate no laptop could dream of. For most families, the phone holds the largest concentration of irreplaceable files in the household, and it leads the most dangerous lifestyle. Fixing this takes about four minutes per phone.
On an iPhone: Settings, tap your name at the top, iCloud, Photos, and turn on “Sync this iPhone.” Your entire library uploads over Wi-Fi whenever the phone charges. On Android (or iPhone, if you prefer Google’s world): install Google Photos, tap your profile picture, turn on Backup — the official instructions at Back up photos & videos walk through it. Choose “Original quality” if your storage plan allows; the compressed “Storage saver” tier is fine for snapshots but slightly shrinks your originals, and future-you printing a photo for a frame will care about the difference.
Then — and this is the step everyone skips — check that it’s actually working. Open the web version of your service (icloud.com or photos.google.com) on a computer and scroll through. Are the photos from last weekend there? Good, your third copy exists. Are they not there, because the phone is set to upload only on Wi-Fi and you pay for unlimited data anyway, or because the upload quietly paused four months ago? Congratulations, you just earned the entire value of this article. A backup that silently stopped is functionally identical to no backup, except you pay for it monthly.
For true belt-and-suspenders on phone photos, add one more path: let your computer’s backup system catch them too. If your phone syncs photos to the cloud and your computer syncs that same library down (Macs with iCloud Photos do this automatically; Google Photos users can grab periodic exports), then Time Machine or File History sweeps them onto the external drive as well. Suddenly your photos exist in four places, and the probability of losing them all drops to something you’d need an astronomer to calculate.
Test the Restore (Yes, Really)
The fifteen-minute fire drill
Here’s the step that separates people who have backups from people who have backup-shaped decorations. Once every few months — put it on the calendar, quarterly, right next to “change toothbrush” — run a restore drill. Pick a file at random. Not an important one; that’s the point, because you’re rehearsing, and rehearsals shouldn’t be stressful. Delete it (or just pretend) and get it back from the backup.
On a Mac: open Time Machine (it’s in the menu bar), and the screen slides back through a stack of windows like a time-travel film montage — scroll to last week, find the file, click Restore. On Windows: right-click the folder that held the file, choose “Restore previous versions,” pick a date, done. From the cloud: log into the web interface, find the trash or version history, recover something. The whole exercise takes fifteen minutes, and it answers the only question that matters: does the machinery actually work when a human operates it under mild stress?
The drill catches the failure modes that lurk in every real backup setup: the external drive that got unplugged during a desk reorganization and never reconnected, the cloud account whose payment card expired (the service emails you about this; the email goes to the account you never check), the File History drive that filled up six months ago and has been faithfully backing up nothing since. None of these announce themselves. They wait, silently, for the day you need them. The drill finds them on a calm Sunday instead of during an emergency, which is the entire philosophy of this article in one habit: everything about backups is easy if you do it before you need it, and brutal if you do it after.
The Household Rollout
Other people’s photos are your problem too
One last thing, and it’s the part that actually determines whether this all works: the other people in your house. Your careful 3-2-1 system covers your devices, but your partner’s phone with two-thirds of the family photos on it, and the kid’s laptop with the college application essays, are their own unbacked-up universes. The fix is not a lecture — lectures about backups have a historical success rate of zero percent. The fix is doing the four-minute phone setup on every device in the household yourself, the way you’d check that everyone’s seatbelt is on before driving. One shared family cloud plan (Apple, Google, and Microsoft all offer them, and they’re cheaper per person than individual plans) plus one evening of walking from device to device toggling switches, and the whole household enters civilization.
While you’re at it, designate the external drive’s home and tell everyone where it lives. Backups have a way of becoming mysterious objects — “the thing Dad plugs in sometimes” — and the household should know that the small black rectangle next to the computer contains a complete copy of everything, and what to grab on the way out during a fire. (The honest answer is: grab nothing, the cloud copy exists. But knowing the drive is there is what lets you make that choice calmly.)
The Afternoon, Hour by Hour
The whole project on one timeline
Here’s the realistic schedule. Hour one: buy the drive (any electronics store, any big-box store, online — 2 to 4 TB, a brand you’ve heard of, done) and plug it in. Hour two: turn on File History or Time Machine, confirm the first backup has started, and while it grinds away, set up the cloud account and turn on photo sync on every phone in the house. Hour three: verify — open the cloud service on the web and see photos arriving; watch Time Machine or File History report its first completed backup. Then unplug nothing, touch nothing, and put “restore drill” on the calendar for three months from now. Total active effort: maybe ninety minutes of actual doing, spread across an afternoon of mostly waiting. Total ongoing effort: approximately zero, forever, plus one fifteen-minute drill per quarter.
And then, someday — statistically, it is a matter of when, not if — a drive will die, or a phone will meet a lake, or a laptop will decide to become an appliance with opinions. On that day you will feel a brief pang, followed by something most people in that moment never get to feel: mild annoyance instead of grief. You’ll plug in the drive, or log into the cloud, and watch your whole life come back. That is the entire payoff, and it is worth every minute of the afternoon.
This article is educational and is not professional IT advice; backup needs vary, and genuinely irreplaceable archives may warrant more copies than three. Sources referenced include Apple’s Time Machine guide, Microsoft’s File History documentation, and Google Photos backup help. No affiliate links or sponsored content. External links verified live at publication, August 2026.